113+ Timber Framing

Jumat, 31 Oktober 2025

0 komentar
Timber framing schools and workshops timberframehq.com

Here's a step-by-step guide on how to make a small timber frame structure:
Opening: A Humble Timber Frame Project Are you ready to dive into the world of timber framing? This guide will walk you through building a simple, small-scale timber frame project, perfect for beginners. This project could be used as a base for a small shed, garden structure, or even just a decorative element. Remember, safety is paramount, so always wear appropriate safety gear and work with someone experienced if you're new to woodworking.
Step 1: Design and Planning Before you pick up any tools, meticulous planning is essential.
  • Sketch your design: Draw a rough sketch of what you want your timber frame to look like. Consider the overall dimensions, the number of posts, beams, and braces. Simple is best when starting out.
  • Create a cut list: Based on your design, create a detailed cut list. This list should specify the length, width, and thickness of each timber you'll need. Accurate measurements are crucial.
  • Choose your wood: Select your timbers. Softwoods like pine or fir are generally more affordable and easier to work with for beginners. Hardwoods like oak or maple are more durable but require more effort. Ensure your timber is straight, free from excessive knots, and properly dried to prevent warping.
Step 2: Gathering Tools and Materials Collect all the necessary tools and materials before starting.
  • Timbers: As specified in your cut list.
  • Measuring tools: Tape measure, square, level.
  • Marking tools: Pencil, chalk line.
  • Cutting tools: Circular saw, hand saw (timber saw or Japanese saw). A chainsaw can be useful for larger timbers but requires experience.
  • Drilling tools: Drill, drill bits.
  • Chisels: Various sizes of chisels and a mallet for mortise and tenon joinery.
  • Fasteners: Timber frame screws, dowels, or traditional pegs, depending on your joinery method.
  • Safety gear: Safety glasses, hearing protection, gloves, dust mask.
Step 3: Cutting the Timbers Carefully cut all the timbers according to your cut list.
  • Double-check your measurements: Before making any cuts, double-check your measurements to avoid mistakes.
  • Cut accurately: Use a circular saw or hand saw to cut the timbers to the correct lengths. A speed square or framing square will help ensure your cuts are square.
  • Label each piece: Label each timber with its corresponding designation on your cut list to avoid confusion later.
Step 4: Cutting the Joinery (Mortise and Tenon Joints) Timber framing relies on strong joinery. Mortise and tenon joints are a common choice.
  • Mark the joinery: Precisely mark the locations of mortises and tenons on your timbers. Use a square and measuring tools to ensure accuracy.
  • Cut the mortises: A mortise is a rectangular hole cut into one timber. You can use a drill to remove most of the material and then clean up the mortise with chisels.
  • Cut the tenons: A tenon is a projection that fits into the mortise. Use a saw to cut the tenon to the correct size and shape.
  • Test the fit: Test the fit of each mortise and tenon joint to ensure they fit snugly. Make any necessary adjustments with chisels.
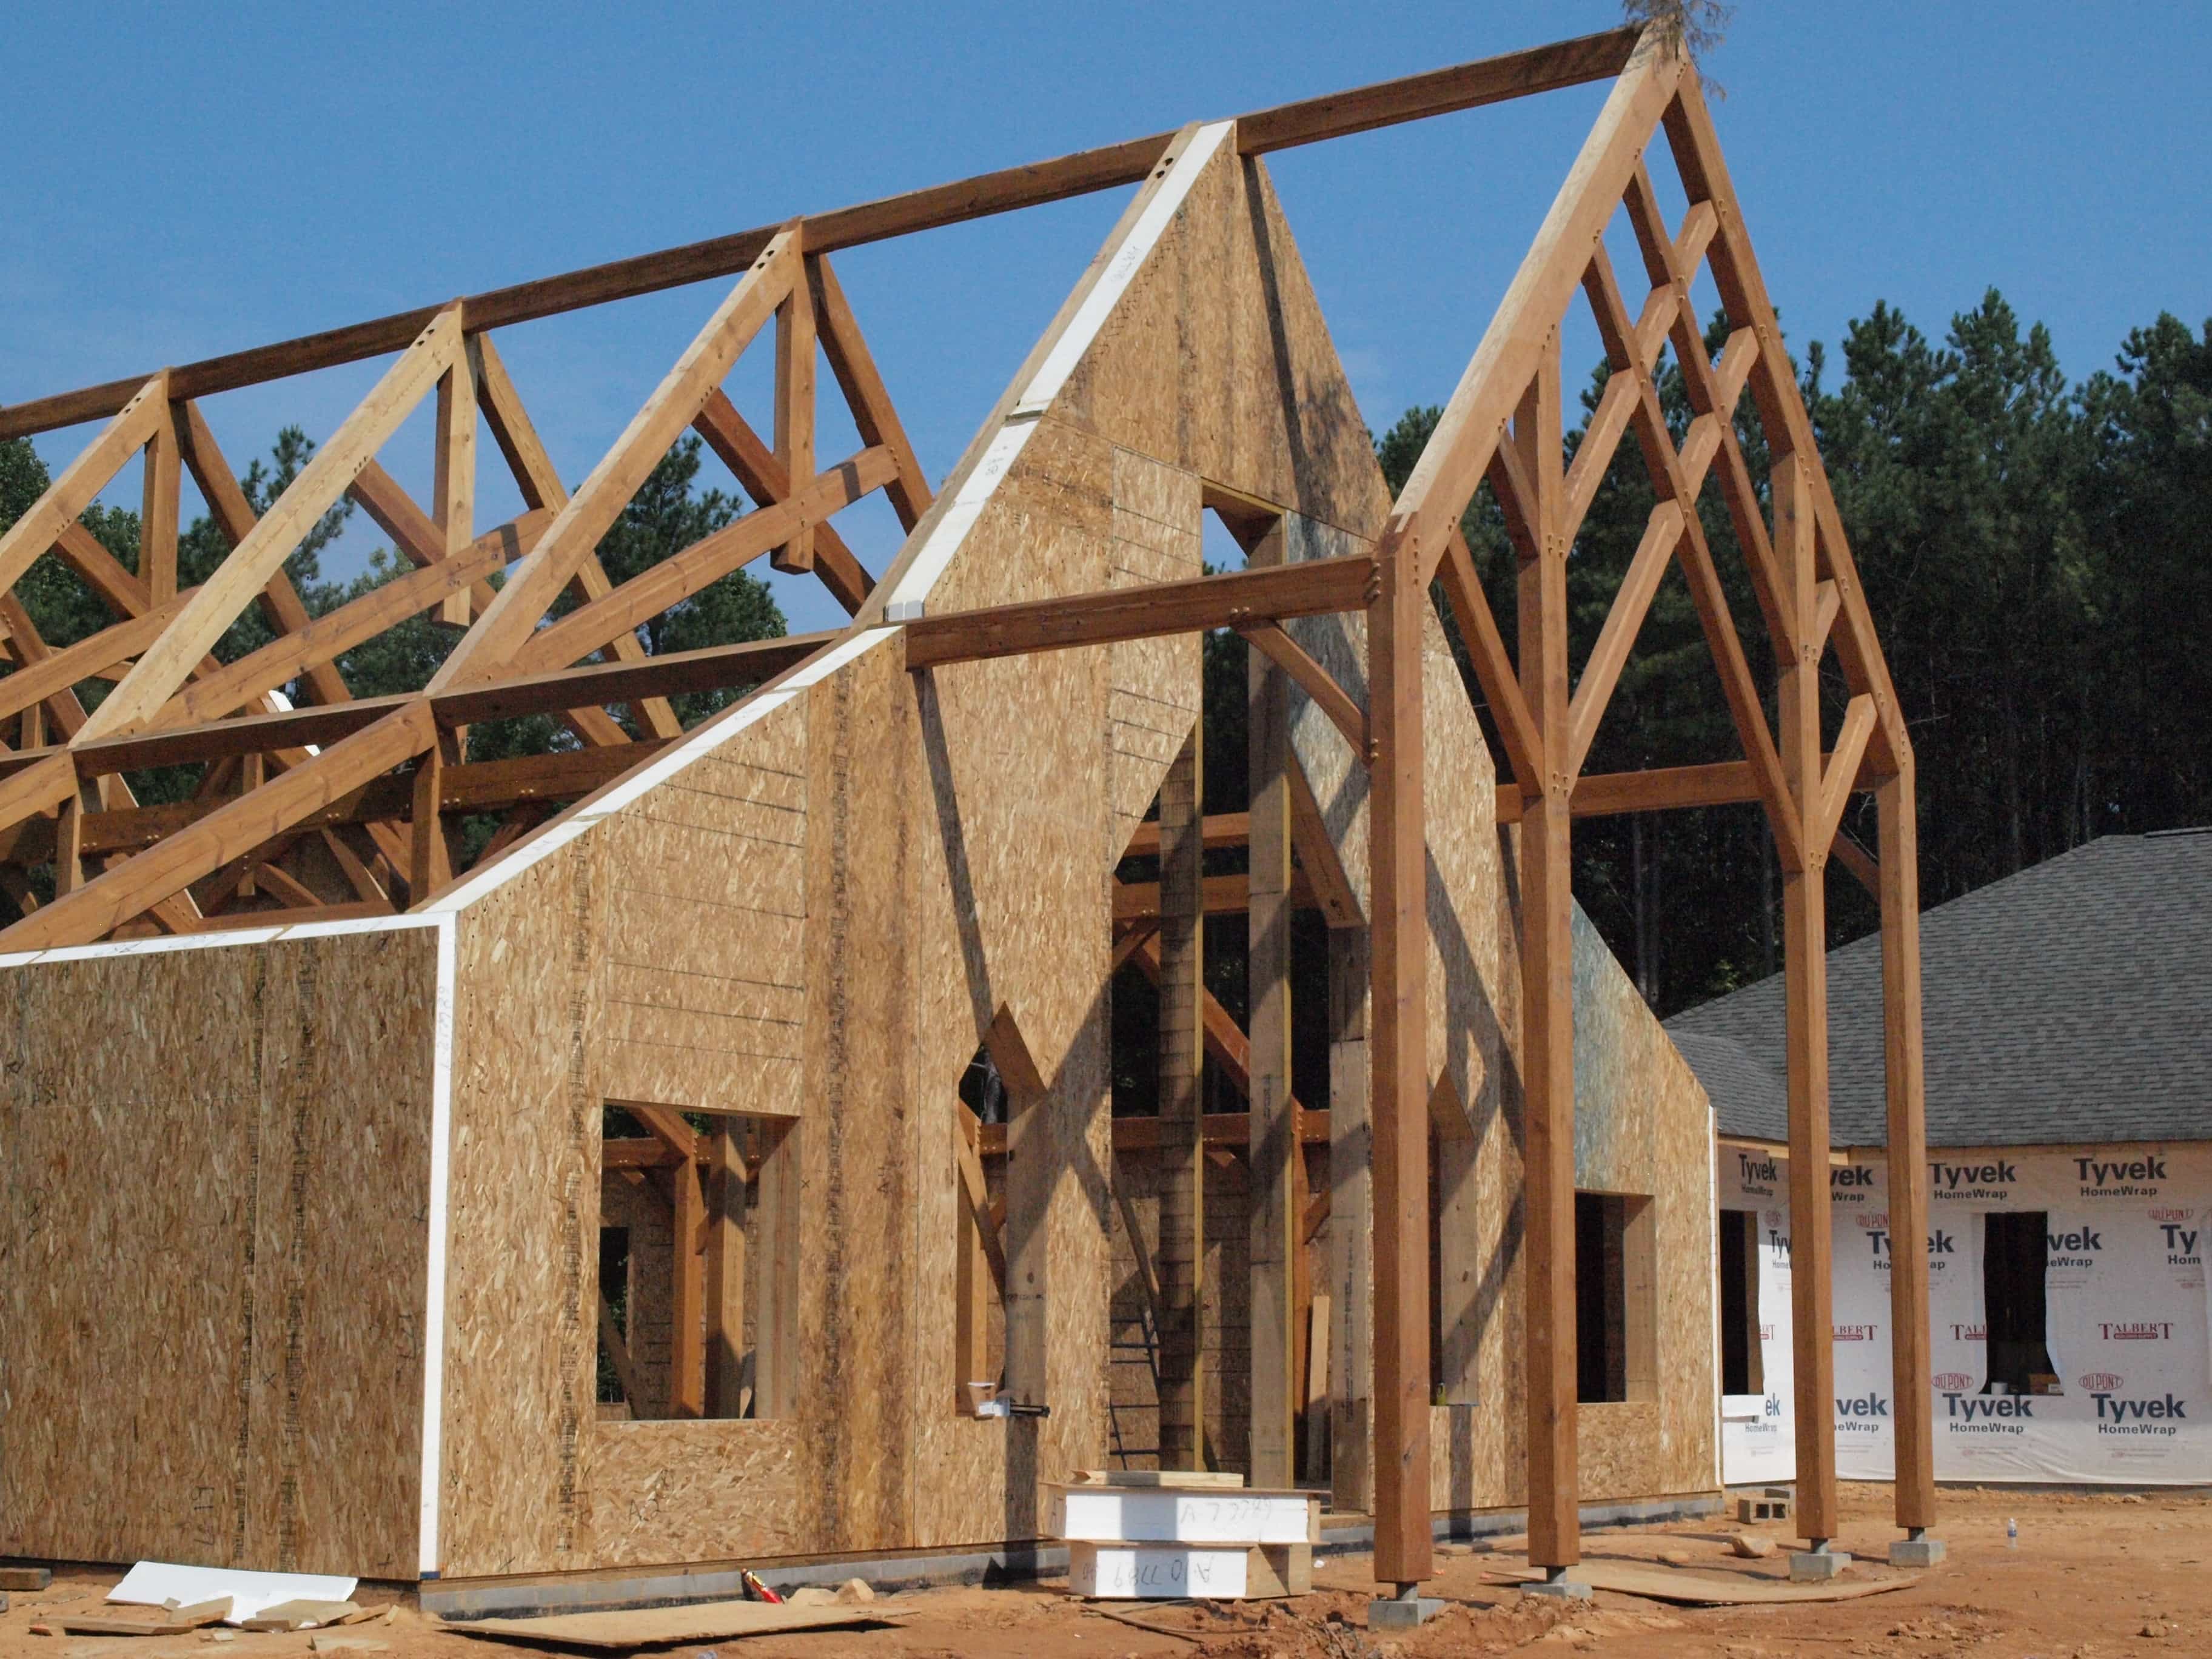
Step 5: Assembling the Frame With the timbers cut and the joinery prepared, it's time to assemble the frame.
  • Dry fit the frame: Assemble the frame without any fasteners to check the fit and make any necessary adjustments.
  • Apply fasteners: Once you're satisfied with the fit, apply fasteners to secure the joints. You can use timber frame screws, dowels, or traditional wooden pegs. If using pegs, drill through the mortise and tenon and insert the pegs.
  • Ensure squareness: As you assemble the frame, use a square to ensure that it's square and plumb.
Step 6: Adding Braces (Optional but Recommended) Braces add significant strength and stability to the frame.
  • Cut the braces: Cut the braces to the correct length and angle. Common angles are 45 degrees.
  • Join the braces: Use mortise and tenon joints or other suitable joinery methods to connect the braces to the posts and beams.
  • Secure the braces: Fasten the braces securely using screws, dowels, or pegs.
Conclusion: A Small Timber Frame Accomplishment Congratulations! You've built a small timber frame structure. This project is a great introduction to the art of timber framing. Remember to properly protect your timber frame from the elements with a suitable finish or sealant. As you gain experience, you can tackle more complex and ambitious timber frame projects.

Types Of Wood Framing

Types of wood framing fity.club

Timber Framing Schools And Workshops

Timber framing schools and workshops timberframehq.com

Timber Framing

Timber framing www.benjamin-co.com
Read More..

42+ Shed Apartment Plans

Kamis, 30 Oktober 2025

0 komentar
Cedarshed studio 12x6 shed [st126] www.shednation.com

Introduction: Crafting Your Own Tranquil Shed Apartment Transforming a simple shed into a cozy and functional apartment offers an affordable and creative solution for extra living space, a home office, or even a guest suite. This step-by-step guide will walk you through the process, from planning to finishing touches, to help you create your dream shed apartment.
Step 1: Planning and Preparation Before you even think about hammering a nail, thorough planning is crucial.
  • Check Local Regulations: Research local zoning laws and building codes to ensure your project is compliant and obtain necessary permits. This could include restrictions on size, setbacks, or utility connections.
  • Assess Your Shed: Evaluate the existing shed's structural integrity. Check for rot, insect damage, and foundation issues. Make necessary repairs or consider building a new shed designed for living.
  • Design Your Layout: Plan the layout of your apartment, including sleeping area, bathroom, kitchenette, and living space. Consider the placement of windows and doors for natural light and ventilation. Draw out your plans.
  • Create a Budget: Estimate the costs of materials, labor (if hiring), and permits. Factor in unexpected expenses. Shop around for the best deals on materials.
  • Step 2: Foundation and Framing (If Necessary) If you're starting with an existing shed, verify the foundation is solid. If building from scratch, consider these options:
  • Concrete Slab: Provides a stable and level surface.
  • Gravel Pad with Concrete Blocks: A more affordable option for smaller sheds.
  • Treated Lumber Foundation: Raised foundation for better ventilation.
  • For new shed construction, follow standard framing practices, ensuring the structure is square, plumb, and level. Use pressure-treated lumber for ground contact. Add studs at regular intervals for structural support.
    Step 3: Insulation and Weatherproofing Proper insulation is essential for comfort and energy efficiency.
  • Insulation: Use fiberglass batts, spray foam, or rigid foam boards to insulate walls, ceiling, and floor.
  • Vapor Barrier: Install a vapor barrier to prevent moisture buildup within the walls.
  • Weatherproofing: Seal all cracks and seams with caulk or weather stripping to prevent drafts and water leaks. Install flashing around windows and doors.
  • Step 4: Plumbing and Electrical These are critical systems that should ideally be handled by qualified professionals, but if DIYing, be extremely careful.
  • Plumbing: Install water supply lines and drain lines for the bathroom and kitchenette. Consider a tankless water heater for efficiency.
  • Electrical: Run electrical wiring for outlets, lights, and appliances. Install a circuit breaker panel. Ensure all wiring meets local codes.
  • Permits: Get the necessary plumbing and electrical permits and inspections.
  • Step 5: Interior Finishing This is where your vision comes to life.
  • Walls and Ceiling: Install drywall or paneling for walls and ceiling. Tape, mud, and sand the drywall seams for a smooth finish.
  • Flooring: Choose a flooring material that is durable and easy to clean, such as laminate, vinyl, or tile.
  • Windows and Doors: Install windows and doors according to the manufacturer's instructions. Ensure they are properly sealed to prevent drafts.
  • Step 6: Kitchenette and Bathroom Maximize space with compact appliances and fixtures.
  • Kitchenette: Install a small sink, countertop, and cabinets. Consider a compact refrigerator and a two-burner cooktop.
  • Bathroom: Install a toilet, sink, and shower. Ensure proper ventilation to prevent moisture buildup.
  • Step 7: Final Touches and Decorating Add your personal style to make the shed apartment feel like home.
  • Painting: Paint the walls and trim to create a desired ambiance.
  • Lighting: Install adequate lighting, including overhead lights, task lighting, and accent lighting.
  • Decorating: Add furniture, rugs, and accessories to personalize the space.
  • Conclusion: Enjoy Your New Shed Apartment With careful planning and execution, you can transform an ordinary shed into a comfortable and functional living space. Remember to prioritize safety, follow local codes, and enjoy the process of creating your own unique shed apartment.

    Cedarshed Studio 12x6 Shed [st126]

    Cedarshed studio 12x6 shed [st126] www.shednation.com

    Cedar Lap Siding Saltbox Sheds

    Cedar lap siding saltbox sheds www.gazebocreations.com

    Sheds With Covered Porches — Storage Sheds Mn, Wi

    Sheds with covered porches — storage sheds mn, wi theshedshopusa.com
    Read More..

    114+ Storage Shed Greenhouse Combo

    Rabu, 29 Oktober 2025

    0 komentar
    Self storage units in middleton, wi www.kostorage.com

    Introduction: The Ultimate Backyard Project Shed and Greenhouse Combo Combining a storage shed with a greenhouse offers the best of both worlds: ample space to store gardening tools, equipment, and supplies, alongside a controlled environment to cultivate plants, extend the growing season, or simply enjoy year-round gardening. This DIY project, while ambitious, is achievable with careful planning, the right tools, and a step-by-step approach. This guide will walk you through building your own 114+ sq ft Storage Shed Greenhouse Combo.
    Planning & Design: Laying the Foundation for Success Before you even think about swinging a hammer, meticulous planning is essential. Consider the following factors:
  • Location: Choose a location that receives ample sunlight for the greenhouse portion, ideally facing south or southeast. Ensure the ground is relatively level and well-draining. Check for any underground utilities before you dig.
  • Size & Dimensions: This guide aims for a 114+ sq ft structure. Determine the proportions of shed vs. greenhouse based on your needs. A common approach is a 6ft x 10ft shed combined with a 6ft x 10ft greenhouse, resulting in a 12ft x 10ft (120 sq ft) footprint. Adjust the dimensions as needed.
  • Materials: Pressure-treated lumber is crucial for the foundation and framing to resist rot and insect damage. Consider using polycarbonate panels for the greenhouse walls and roof – they are durable, lightweight, and offer excellent light transmission. For the shed portion, use siding material that complements your home.
  • Permits: Contact your local building department to determine if permits are required for a structure of this size. Familiarize yourself with local building codes.
  • Design Software or Sketches: Create detailed drawings or use 3D modeling software to visualize your project. This will help you identify potential problems and ensure accurate material estimations. Include details like door and window placement, ventilation, and foundation type.
  • Step 1: Building the Foundation The foundation is the most critical part of the structure. Choose one that suits your soil type and budget:
  • Concrete Slab: This provides the most stable and durable foundation. Excavate the area, create a form, add gravel for drainage, and pour concrete. Ensure it is level. This option requires the most labor and cost.
  • Gravel Pad with Concrete Blocks: A more budget-friendly option involves creating a level gravel pad and setting concrete blocks on top. This raises the structure off the ground and prevents moisture damage. Ensure the blocks are level and spaced appropriately to support the frame.
  • Skid Foundation: Using pressure treated 4x6 beams as "skids" upon a gravel base is another common method. This allows the structure to be moved if needed.
  • Regardless of the foundation type, ensure proper drainage to prevent water accumulation.
    Step 2: Framing the Walls Once the foundation is in place, build the wall frames:
  • Cut Lumber: Accurately cut all lumber according to your plans. Use a miter saw for clean, precise cuts.
  • Assemble Frames: Construct the wall frames using 2x4 lumber. Space studs every 16 inches on center. Ensure the frames are square before securing them with screws or nails.
  • Shed vs. Greenhouse Frames: The shed walls should be solid, while the greenhouse walls will require openings for windows, vents, and polycarbonate panels. Consider incorporating a door frame into the shed wall.
  • Raising the Walls: With help, raise the wall frames onto the foundation and secure them to the foundation and each other. Use temporary bracing to keep the walls plumb and level.
  • Step 3: Building the Roof The roof is crucial for weather protection and structural integrity:
  • Rafters or Trusses: Decide on a roof style – gable, shed, or hoop. Gable roofs are common and provide good headroom. Build rafters or trusses according to your plans.
  • Roof Sheathing: Attach sheathing (plywood or OSB) to the rafters or trusses. This provides a solid surface for roofing materials.
  • Roofing Material (Shed): Install roofing felt or underlayment, followed by shingles, metal roofing, or other desired roofing material for the shed section.
  • Greenhouse Roof: For the greenhouse roof, design it to allow maximum light penetration. Polycarbonate panels are a good choice. Ensure a watertight seal around the panels. Consider adding vents to prevent overheating.
  • Be sure to follow local building codes regarding roof load requirements, especially in areas with heavy snow or wind.
    Step 4: Siding & Finishing (Shed) Enclose the shed portion to protect your stored items:
  • Siding Installation: Install siding according to the manufacturer's instructions. Overlap the siding properly to prevent water intrusion.
  • Door & Window Installation: Install the door and any windows in the shed walls. Ensure they are properly sealed.
  • Interior Finishing (Optional): Add shelves, workbenches, or other storage solutions to the shed interior.
  • Step 5: Greenhouse Enclosure & Ventilation Complete the greenhouse section:
  • Polycarbonate Panel Installation: Cut and install the polycarbonate panels according to your design. Use appropriate fasteners and sealants to create a weather-tight seal.
  • Ventilation: Install vents to allow for proper air circulation. Consider automatic vent openers that respond to temperature changes.
  • Door Installation: Install a door for easy access to the greenhouse.
  • Step 6: Final Touches & Landscaping The final steps bring everything together:
  • Sealing & Weatherproofing: Caulk and seal all joints and seams to prevent water intrusion.
  • Landscaping: Grade the area around the shed/greenhouse to ensure proper drainage.
  • Interior Setup (Greenhouse): Add benches, shelving, or hanging baskets for your plants.
  • Electrical & Plumbing (Optional): If desired, run electrical wiring and plumbing to the structure for lighting, heating, or watering systems. Consult with a qualified electrician or plumber.
  • Conclusion: Enjoy Your DIY Shed Greenhouse Combo! Building a shed and greenhouse combo is a challenging but rewarding project. With careful planning, patience, and attention to detail, you can create a functional and aesthetically pleasing addition to your backyard. Enjoy the extra storage space and the ability to grow your own plants year-round. Remember to consult local building codes and, if necessary, seek professional assistance for tasks you are not comfortable performing yourself.

    Storage Units In Dublin

    Storage units in dublin www.storageunitsdublin.com

    How To Buy A Storage Unit

    How to buy a storage unit www.holdstorage.co.uk

    Self Storage Units In Middleton, Wi

    Self storage units in middleton, wi www.kostorage.com
    Read More..

    102+ Flat Roof Shade Structure

    Selasa, 28 Oktober 2025

    0 komentar
    Best 20+ flat pictures & images unsplash.com

    Introduction: Creating a DIY Flat Roof Shade Structure
    Flat roofs, while offering modern aesthetics and usable space, can become unbearable in hot weather. Building a shade structure provides respite from the sun, reduces indoor temperatures, and enhances the outdoor living experience. This guide will walk you through the process of constructing a simple yet effective DIY shade structure for your flat roof.
    Planning and Preparation
    Before diving into the construction, careful planning is crucial. Consider the following:
  • Measuring the Space: Determine the area you want to shade. Accurately measure the length and width of the desired shaded area.
  • Choosing Materials: Select materials based on durability, aesthetics, and budget. Popular choices include lumber (treated for outdoor use), metal pipes, and shade cloth.
  • Design Considerations: Decide on the style and height of your structure. A simple frame with a shade cloth covering is a good starting point. Ensure your design accounts for wind resistance.
  • Local Building Codes: Check with your local authorities for any building permits or regulations regarding structures on flat roofs.
  • Materials and Tools Required
    Gather the following materials and tools before starting:
  • Lumber or Metal Pipes (depending on your chosen material)
  • Shade Cloth (select the desired shade percentage)
  • Wood Screws or Metal Fasteners (appropriate for your materials)
  • Drill
  • Saw (circular saw or hand saw)
  • Measuring Tape
  • Level
  • Pencil or Marker
  • Safety Glasses
  • Work Gloves
  • Concrete Anchors (if securing to the roof surface)
  • Step-by-Step Construction
    Follow these steps to build your flat roof shade structure:
  • Step 1: Build the Frame: Construct the frame according to your design. This typically involves creating a rectangular or square frame from lumber or metal pipes. Ensure all corners are square and securely fastened.
  • Step 2: Install Support Posts: If your design requires support posts, attach them to the frame. Use concrete anchors to secure the posts to the roof surface, ensuring they are plumb and level. Alternatively, you can create a free-standing structure if your design allows.
  • Step 3: Attach the Shade Cloth: Lay the shade cloth over the frame. Secure it to the frame using wood screws or metal fasteners. Stretch the cloth taut to prevent sagging and flapping in the wind. You may need to use additional fasteners along the edges for added security.
  • Step 4: Reinforce the Structure: Add additional support or bracing if needed, especially if you live in a windy area. This can involve adding diagonal supports to the frame or using heavier-duty fasteners.
  • Step 5: Finishing Touches: Inspect the entire structure for any loose connections or sharp edges. Make any necessary adjustments and clean up the work area.
  • Securing to the Roof
    Properly securing the shade structure to the roof is crucial for safety and stability. Consider these points:
  • Concrete Anchors: Use high-quality concrete anchors specifically designed for flat roofs. Follow the manufacturer's instructions for installation.
  • Weight Distribution: Distribute the weight of the structure evenly across the roof surface to avoid concentrated stress points.
  • Waterproofing: Ensure that any holes drilled into the roof are properly sealed to prevent leaks. Use appropriate sealants and flashing around anchor points.
  • Alternative Mounting Options
    If drilling into your roof is not an option, explore these alternatives:
  • Free-Standing Structure: Design a self-supporting structure that does not require attachment to the roof. Ensure the base is wide and stable.
  • Weighted Bases: Use weighted bases (such as concrete blocks or sandbags) to secure the structure. These bases should be heavy enough to withstand wind loads.
  • Existing Structures: Utilize existing walls or parapets to anchor the shade structure.
  • Conclusion: Enjoying Your Shaded Space
    With careful planning and execution, you can create a functional and aesthetically pleasing shade structure for your flat roof. Enjoy the cooler temperatures, reduced glare, and enhanced outdoor living space. Remember to regularly inspect and maintain your structure to ensure its longevity and safety.

    Best 20+ Flat Pictures & Images

    Best 20+ flat pictures & images unsplash.com

    100+ Flats Pictures

    100+ flats pictures unsplash.com

    Main Differences Between Flat & Apartment Every Homebuyer Should Know

    Main differences between flat & apartment every homebuyer should know www.homebazaar.com
    Read More..

    66+ Storage Shed Sale

    Senin, 27 Oktober 2025

    0 komentar
    Storage units in dublin www.storageunitsdublin.com

    Opening: Unleash Your Inner Builder: DIY Shed Project
    Ready to conquer clutter and gain valuable storage space? Building your own shed is a rewarding project that can save you money and provide a customized solution for your needs. This step-by-step guide will walk you through the process, from planning to completion. Get ready to roll up your sleeves and create your own backyard haven!
    Step 1: Planning and Preparation
    Before you grab your tools, careful planning is crucial. This stage involves determining your shed's size, location, and design. Consider your storage needs, budget, and local building codes.
    • Determine the size and purpose of your shed: How much storage space do you need? What will you be storing? (gardening tools, lawnmower, bikes, etc.) This will dictate the shed's dimensions.
    • Choose a location: Select a level, well-drained area away from property lines and overhead obstructions (power lines, trees). Check local zoning regulations and building codes to ensure compliance.
    • Create a design: Sketch out your shed design, including dimensions, door and window placement, and roofing style. You can find free shed plans online or purchase detailed plans from a home improvement store.
    • Obtain necessary permits: Contact your local building department to determine if a building permit is required for your shed.
    • Gather materials: Create a materials list based on your plans. Common materials include lumber (for framing, siding, and roofing), concrete blocks or gravel (for the foundation), roofing materials (shingles, metal), fasteners (nails, screws), and hardware (door hinges, latches).
    • Acquire tools: Ensure you have the necessary tools for the job, including a measuring tape, level, square, saw (circular saw or hand saw), drill, hammer, screwdriver, and safety glasses.
    Step 2: Building the Foundation
    A solid foundation is essential for a stable and long-lasting shed. There are several foundation options, including a concrete slab, a gravel base, or concrete blocks. We will focus on a simple concrete block foundation.
    • Prepare the site: Remove any vegetation and topsoil from the shed's location. Level the ground and compact it with a hand tamper or plate compactor.
    • Lay out the foundation: Use stakes and string to mark the perimeter of your shed. Ensure the corners are square using the 3-4-5 rule (measure 3 feet along one side, 4 feet along the adjacent side; the diagonal distance between the ends should be 5 feet).
    • Place the concrete blocks: Position concrete blocks along the perimeter of the layout, spacing them evenly apart (typically 4-6 feet). Ensure the blocks are level with each other using a level and shims if necessary.
    • (Optional) Fill the blocks with gravel: For added stability and drainage, fill the hollow cores of the concrete blocks with gravel.
    Step 3: Framing the Walls
    The wall framing provides the structural support for your shed. This step involves building the wall frames, raising them, and securing them to the foundation.
    • Cut the lumber: Cut the lumber according to your plans for the top plate, bottom plate, studs, and any window or door headers.
    • Assemble the wall frames: Lay out the top and bottom plates on a flat surface. Position the studs between the plates, spacing them typically 16 inches on center (OC). Nail or screw the studs to the plates to create the wall frame.
    • Frame openings for doors and windows: Add headers above the door and window openings to provide support.
    • Raise the walls: Carefully lift the wall frames into place, starting with one corner. Use temporary braces to hold the walls upright.
    • Secure the walls: Connect the walls to each other at the corners using nails or screws. Ensure the walls are plumb (vertical) using a level.
    • Attach the walls to the foundation: Secure the bottom plates to the concrete blocks using concrete anchors or construction adhesive.
    Step 4: Building the Roof
    The roof protects your shed from the elements. This step involves building the roof rafters or trusses, sheathing the roof, and installing the roofing material.
    • Build rafters or trusses: Depending on your shed design, you can build rafters or trusses. Rafters are individual framing members that slope from the top plate to the ridge beam. Trusses are pre-fabricated triangular structures that provide support for the roof. If you are a beginner, consider using pre-made trusses for simplicity.
    • Install the rafters or trusses: Position the rafters or trusses on the top plates, spacing them evenly apart (typically 24 inches OC). Secure them to the top plates using nails or screws.
    • Install the ridge beam: For rafter construction, install a ridge beam at the peak of the roof to provide support.
    • Sheathe the roof: Cover the rafters or trusses with plywood or OSB sheathing. Nail or screw the sheathing to the rafters or trusses.
    • Install roofing underlayment: Cover the sheathing with roofing underlayment (felt paper or synthetic underlayment) to provide a waterproof barrier.
    • Install roofing material: Install your chosen roofing material (shingles, metal, etc.) according to the manufacturer's instructions.
    Step 5: Installing Siding and Trim
    Siding protects the walls of your shed from the elements and gives it a finished appearance. This step involves installing the siding and trim.
    • Install siding: Install your chosen siding material (wood siding, vinyl siding, metal siding, etc.) according to the manufacturer's instructions. Overlap the siding pieces to create a weatherproof seal.
    • Install trim: Install trim around the doors, windows, and corners of the shed to cover any exposed edges and create a finished look.
    Step 6: Installing Doors and Windows
    Doors provide access to your shed, and windows provide light and ventilation. This step involves installing the doors and windows.
    • Install door frame: Install the door frame into the framed opening. Ensure it is plumb and square.
    • Hang the door: Attach the door to the door frame using hinges. Ensure the door swings smoothly and closes properly.
    • Install window frame: Install the window frame into the framed opening. Ensure it is plumb and square.
    • Install the window: Install the window into the window frame. Ensure it is sealed properly.
    Step 7: Interior Finishing (Optional)
    Depending on your needs, you may want to add interior finishing to your shed. This can include insulating the walls and ceiling, adding electrical wiring, and installing shelving.
    • Insulate the walls and ceiling: Install insulation between the studs and rafters to improve energy efficiency.
    • Install electrical wiring: If you plan to use electricity in your shed, hire a qualified electrician to install electrical wiring and outlets.
    • Install shelving: Install shelves to maximize storage space.
    Conclusion: Enjoy Your New Shed!
    Congratulations! You have successfully built your own shed. Take a step back and admire your handiwork. Your new shed is now ready to provide valuable storage space for years to come. Remember to regularly maintain your shed to keep it in good condition. Now, get organized and enjoy your clutter-free backyard!

    How To Buy A Storage Unit

    How to buy a storage unit www.holdstorage.co.uk

    Self Storage Units In Middleton, Wi

    Self storage units in middleton, wi www.kostorage.com

    Storage Units In Dublin

    Storage units in dublin www.storageunitsdublin.com
    Read More..

    161+ 10x20 Storage Shed Plans Free

    Minggu, 26 Oktober 2025

    0 komentar
    10x20 storage shed plans shedplans.org

    Opening: Expanding Your Storage with a DIY 10x20 Shed Need extra space? A 10x20 storage shed provides ample room for tools, lawn equipment, or seasonal decorations. Building your own not only saves money but also allows you to customize the design to perfectly fit your needs and property. This guide provides a step-by-step approach to building your own 10x20 storage shed.
    Step 1: Planning and Preparation Before you even think about hammering a nail, careful planning is crucial.
  • Check Local Regulations: Verify building codes, zoning laws, and permit requirements with your local authorities. This might include setback distances from property lines and maximum height restrictions.
  • Choose a Site: Select a level and well-drained area for your shed. Consider accessibility for moving materials and future use.
  • Gather Materials: Create a detailed materials list based on your chosen shed plans. A typical 10x20 shed will require lumber for the frame, sheathing for the walls and roof, roofing materials, siding, a door, windows (optional), concrete for the foundation (or gravel pad), and fasteners.
  • Purchase Plans: While you can design your own, purchasing pre-made 10x20 shed plans will save you time and ensure structural integrity. Look for plans that include detailed material lists, cutting diagrams, and step-by-step instructions. Free plans are often available but may lack the detail and engineering of paid plans.
  • Gather Tools: Ensure you have all the necessary tools. Essential tools include a circular saw, miter saw, drill, level, square, tape measure, hammer, nail gun (optional), safety glasses, work gloves, and a shovel.
  • Step 2: Building the Foundation The foundation is the most critical part of your shed, ensuring stability and preventing moisture damage.
  • Option 1: Concrete Slab: Pouring a concrete slab provides the most durable and level foundation. Form up the slab area, compact the soil, and pour concrete to the desired thickness. Ensure the slab is perfectly level.
  • Option 2: Gravel Pad: A gravel pad is a less expensive and less permanent option. Excavate the area, lay down landscape fabric, and fill with several inches of compacted gravel.
  • Option 3: Skids: Using pressure-treated skids as a base is another option. Ensure the skids are level and properly supported.
  • Step 3: Framing the Floor With the foundation in place, it's time to build the floor frame.
  • Cut Lumber: Cut the lumber according to your plans, typically using pressure-treated lumber for the frame.
  • Assemble the Frame: Assemble the floor frame, ensuring it is square and level. Use fasteners appropriate for outdoor construction.
  • Install Floor Joists: Install floor joists at the spacing specified in your plans. This provides support for the flooring.
  • Attach Flooring: Attach the flooring material (usually plywood or OSB) to the floor frame.
  • Step 4: Framing the Walls The walls provide the shed's structure and enclose the space.
  • Cut Lumber: Cut the lumber for the wall framing according to your plans.
  • Assemble Wall Frames: Assemble each wall frame individually. Ensure the frames are square and plumb. Include framing for the door and windows (if applicable).
  • Raise and Secure Walls: Raise each wall frame one at a time and secure it to the floor frame. Use temporary bracing to hold the walls in place until all walls are erected.
  • Connect Wall Frames: Connect the wall frames together at the corners, ensuring they are plumb and square.
  • Step 5: Framing the Roof The roof protects the shed from the elements.
  • Choose a Roof Style: Common roof styles include gable, shed, and hip roofs. Choose a style that suits your needs and budget.
  • Cut Rafters or Trusses: Cut rafters (for a gable roof) or build trusses according to your plans. Alternatively, purchase pre-made trusses.
  • Install Rafters or Trusses: Install the rafters or trusses, ensuring they are properly spaced and securely fastened to the wall frames.
  • Install Sheathing: Cover the roof frame with sheathing (usually plywood or OSB).
  • Step 6: Installing Siding and Roofing This step provides weather protection and aesthetic appeal.
  • Install Siding: Install the siding material of your choice. Common options include wood siding, vinyl siding, and metal siding. Overlap the siding correctly to prevent water penetration.
  • Install Roofing: Install the roofing material of your choice. Common options include asphalt shingles, metal roofing, and wood shakes. Follow the manufacturer's instructions for proper installation.
  • Step 7: Installing Doors and Windows These features provide access and light.
  • Install Door: Install the door frame and hang the door. Ensure the door swings smoothly and latches securely.
  • Install Windows: Install the window frames and install the windows. Seal the windows properly to prevent water leaks.
  • Step 8: Finishing Touches These final steps complete the shed.
  • Add Trim: Add trim around the doors, windows, and corners to improve the appearance and seal any gaps.
  • Paint or Stain: Paint or stain the shed to protect the wood and enhance its appearance.
  • Install Shelving and Storage: Install shelving and storage solutions to maximize the use of space inside the shed.
  • Conclusion: Enjoying Your New Storage Shed Congratulations! You've successfully built your own 10x20 storage shed. With careful planning and execution, you've added valuable storage space to your property and gained the satisfaction of completing a DIY project. Remember to maintain your shed regularly to ensure it lasts for years to come.

    10x20 Storage Shed Plans

    10x20 storage shed plans shedplans.org

    10x20 Storage Shed Plans

    10x20 storage shed plans shedplans.org

    10x20 Storage Shed Plans

    10x20 storage shed plans shedplans.org
    Read More..

    155+ Shed With Epoxy Flooring

    Sabtu, 25 Oktober 2025

    0 komentar
    Cedar lap siding deluxe estate sheds www.gazebocreations.com

    ```html
    Introduction: Your Dream Shed with Epoxy Flooring Ready to transform your shed from a drab storage space to a durable, attractive, and functional workshop or hobby haven? Epoxy flooring is the answer! This guide will walk you through the process of building a shed from scratch and then applying a stunning and resilient epoxy finish to the floor. Let's get started!
    Step 1: Planning and Preparation Before you even swing a hammer, careful planning is crucial.
  • Shed Size and Design: Determine the dimensions of your shed based on your needs and available space. Consider the roof style (gable, shed, etc.) and door placement. Sketch out a detailed plan or use online shed design software.
  • Permits and Regulations: Check with your local municipality for any required building permits or zoning regulations. Ignorance is no excuse, and fines can be hefty!
  • Materials List: Create a comprehensive list of all materials needed, including lumber (pressure-treated for the base), sheathing, roofing materials, siding, windows, doors, fasteners, concrete mix (if pouring a slab), and epoxy flooring supplies.
  • Tools: Gather all necessary tools, such as a circular saw, drill, level, measuring tape, hammer, safety glasses, gloves, respirator (for epoxy application), mixing buckets, and epoxy application tools (squeegee, roller).
  • Step 2: Building the Shed Foundation A solid foundation is the key to a long-lasting shed.
  • Concrete Slab (Optional, but Recommended): Pouring a concrete slab provides the most stable and durable base. Prepare the ground, build a form, pour and level the concrete, and allow it to cure properly.
  • Gravel Base (Alternative): If a concrete slab isn't feasible, create a level gravel base with pressure-treated lumber as a perimeter frame. Ensure proper drainage to prevent moisture issues.
  • Step 3: Framing the Shed Walls With the foundation in place, it's time to build the shed's frame.
  • Wall Framing: Cut lumber to the correct lengths based on your plan. Assemble the wall frames, ensuring they are square and plumb. Use fasteners appropriate for outdoor construction.
  • Wall Sheathing: Attach sheathing (plywood or OSB) to the wall frames, providing structural support.
  • Raising the Walls: Carefully raise the wall frames one at a time, securing them to the foundation and each other. Ensure they are plumb and braced for stability.
  • Step 4: Constructing the Roof The roof protects your shed from the elements.
  • Roof Framing: Build the roof frame according to your chosen roof style. This may involve rafters, trusses, or a simple sloping design.
  • Roof Sheathing: Attach sheathing to the roof frame.
  • Roofing Material: Install your chosen roofing material (shingles, metal roofing, etc.) according to the manufacturer's instructions. Proper installation is crucial to prevent leaks.
  • Step 5: Installing Siding, Windows, and Doors Now it's time to enclose the shed.
  • Siding: Install your chosen siding material (wood siding, vinyl siding, etc.) to the exterior walls.
  • Windows and Doors: Install windows and doors according to the manufacturer's instructions. Ensure they are properly sealed to prevent drafts and leaks.
  • Step 6: Preparing the Concrete Floor for Epoxy This is a critical step for a successful epoxy application.
  • Cleaning: Thoroughly clean the concrete floor, removing all dirt, dust, grease, and debris. Use a degreaser if necessary. A pressure washer can be helpful.
  • Patching Cracks and Holes: Fill any cracks or holes in the concrete with a concrete patching compound. Allow it to dry completely.
  • Grinding (Recommended): Grinding the concrete surface with a concrete grinder will create a porous surface that the epoxy can adhere to. This step is highly recommended for optimal results.
  • Acid Etching (Alternative to Grinding): If you don't have access to a grinder, you can acid etch the concrete surface according to the manufacturer's instructions. Be sure to neutralize the acid properly afterward.
  • Final Cleaning: After grinding or etching, thoroughly clean the floor again to remove any remaining dust or residue.
  • Step 7: Applying the Epoxy Floor Coating The moment you've been waiting for!
  • Primer (Optional, but Recommended): Apply an epoxy primer to the concrete floor. This will improve adhesion and create a more uniform surface for the topcoat. Allow it to dry completely according to the manufacturer's instructions.
  • Mixing the Epoxy: Carefully mix the epoxy components according to the manufacturer's instructions. Pay close attention to the mixing ratios and mixing time.
  • Applying the Epoxy: Pour the mixed epoxy onto the floor and spread it evenly with a squeegee or roller. Work in small sections to ensure even coverage.
  • Removing Air Bubbles: Use a spiked roller or a heat gun to remove any air bubbles that may form in the epoxy.
  • Applying Additional Coats (Optional): Apply additional coats of epoxy as desired, allowing each coat to dry completely before applying the next.
  • Step 8: Curing and Final Touches Patience is key during the curing process.
  • Curing Time: Allow the epoxy floor to cure completely according to the manufacturer's instructions. This may take several days or even a week. Avoid walking on the floor during this time.
  • Final Inspection: Once the epoxy is fully cured, inspect the floor for any imperfections.
  • Enjoy! Your shed now has a beautiful, durable, and easy-to-clean epoxy floor.
  • Conclusion: A Shed Transformed Congratulations! You've successfully built a shed and given it a professional-grade epoxy floor. You now have a fantastic space for your hobbies, projects, or simply as a well-organized storage area. The durable epoxy floor will provide years of use and enjoyment. Remember to always follow the manufacturer's instructions for all materials and tools, and prioritize safety throughout the entire process.
    ```

    Cedar Lap Siding Saltbox Sheds

    Cedar lap siding saltbox sheds www.gazebocreations.com

    Cedarshed Studio 12x6 Shed [st126]

    Cedarshed studio 12x6 shed [st126] www.shednation.com

    Cedar Lap Siding Deluxe Estate Sheds

    Cedar lap siding deluxe estate sheds www.gazebocreations.com
    Read More..

    184+ Chicken Coop Backyard Plans

    Jumat, 24 Oktober 2025

    0 komentar
    Raising chickens 101: a beginner's guide to chickens www.almanac.com

    Opening: A DIY Chicken Coop Adventure! So, you're ready to take the plunge and build your own chicken coop! This is a rewarding project that will provide a safe and comfortable home for your feathered friends, while also giving you the satisfaction of creating something with your own two hands. This guide breaks down the process step-by-step, ensuring you have everything you need to succeed. Let's get started!
    Step 1: Planning and Design Before you even think about hammering a nail, careful planning is crucial.
  • Determine the Size: Consider the number of chickens you plan to keep. A general rule of thumb is 4 square feet of coop space per bird and 8-10 square feet of run space per bird.
  • Choose a Design: Research different coop designs online or in books. Consider factors like ease of cleaning, ventilation, predator protection, and aesthetic appeal. Options range from simple A-frame coops to more elaborate shed-style designs.
  • Create a Blueprint: Whether you use a pre-made plan or design your own, a detailed blueprint is essential. This should include dimensions, materials list, and construction steps.
  • Check Local Regulations: Contact your local municipality to see if there are any zoning regulations or permits required for chicken coops.
  • Step 2: Gathering Materials and Tools Once you have a solid plan, it's time to gather the necessary materials and tools. Here's a list to get you started:
  • Lumber: Pressure-treated lumber for the base and framing, untreated lumber for the walls and roof.
  • Plywood or OSB: For sheathing the walls and roof.
  • Roofing Materials: Shingles, metal roofing, or corrugated plastic.
  • Hardware Cloth: For the run to protect against predators. Make sure it's buried at least 12" deep and flared out to prevent digging.
  • Nails and Screws: Various sizes for different applications.
  • Hinges and Latches: For doors and nesting boxes.
  • Chicken Wire: For added security around the run.
  • Nesting Boxes: One nesting box for every 3-4 hens.
  • Roosting Bars: Provide ample roosting space for your chickens.
  • Tools: Saw (circular saw, miter saw, or hand saw), Drill, Hammer, Measuring tape, Level, Staple gun, Safety glasses, Gloves.
  • Step 3: Building the Base The base is the foundation of your coop, so it's important to build it strong and level.
  • Clear the Area: Remove any vegetation or debris from the area where you plan to build the coop.
  • Build the Frame: Construct a rectangular frame using pressure-treated lumber. Ensure the corners are square and the frame is level.
  • Add Support: Add interior supports to the frame to provide additional strength and prevent sagging.
  • Elevate the Base: Consider elevating the base off the ground to prevent moisture damage and make cleaning easier. You can use concrete blocks or posts.
  • Step 4: Framing the Walls With the base complete, it's time to frame the walls of the coop.
  • Cut the Studs: Cut the wall studs to the desired height. Remember to account for the thickness of the base and roof.
  • Assemble the Walls: Assemble the wall frames using nails or screws. Ensure the corners are square and the studs are evenly spaced.
  • Attach the Walls to the Base: Attach the wall frames to the base using nails or screws. Make sure the walls are plumb and square.
  • Frame Door and Window Openings: Frame openings for the door and any windows you plan to include.
  • Step 5: Sheathing the Walls and Adding Roofing Protect your chickens from the elements by sheathing the walls and adding a roof.
  • Cut and Attach Sheathing: Cut plywood or OSB to fit the walls and attach it using nails or screws.
  • Install Roofing: Install your chosen roofing material according to the manufacturer's instructions. Overlap the roofing panels properly to prevent leaks.
  • Add Trim: Add trim around the edges of the roof and walls to provide a finished look and further protect against the elements.
  • Step 6: Building the Run The run provides a safe and enclosed outdoor space for your chickens to roam.
  • Build the Frame: Construct a frame for the run using lumber.
  • Attach Hardware Cloth: Attach hardware cloth to the frame using staples. Ensure the hardware cloth is securely fastened to prevent predators from getting in.
  • Bury the Hardware Cloth: Bury the bottom edge of the hardware cloth at least 12 inches deep and flare it outward to prevent digging predators.
  • Add a Door: Install a door in the run for easy access.
  • Step 7: Adding the Finishing Touches Complete the coop with the necessary features for your chickens' comfort and well-being.
  • Install Nesting Boxes: Install nesting boxes inside the coop. Line them with straw or wood shavings.
  • Install Roosting Bars: Install roosting bars at a comfortable height for your chickens.
  • Add a Door for the Chickens: Cut a hole in the wall of the coop to serve as a door for the chickens to access the run.
  • Ventilation: Ensure adequate ventilation in the coop to prevent moisture buildup. You can add vents near the roofline.
  • Secure the Coop: Add latches and locks to all doors and windows to prevent predators from entering.
  • Conclusion: Enjoy Your New Chicken Coop! Congratulations! You've successfully built your own chicken coop. With proper care and maintenance, your coop will provide a safe and comfortable home for your chickens for years to come. Remember to regularly clean the coop, provide fresh food and water, and monitor your chickens for any signs of illness. Enjoy the rewards of fresh eggs and the companionship of your feathered friends!

    Chicken

    Chicken www.britannica.com

    The Quick And Easy Way To Butcher A Chicken

    The quick and easy way to butcher a chicken www.offthegridnews.com

    Raising Chickens 101: A Beginner's Guide To Chickens

    Raising chickens 101: a beginner's guide to chickens www.almanac.com
    Read More..

    127+ Garbage Shed Plan

    Kamis, 23 Oktober 2025

    0 komentar
    Garbage truck unloading waste at a garbage dump in north rhine-westphalia stock photo www.alamy.com

    Introduction: Keeping Garbage Cans Hidden & Organized A garbage shed not only improves curb appeal but also protects your bins from the elements and keeps critters away. This guide provides a simple, step-by-step plan to build your own functional and attractive garbage shed.
    Step 1: Planning & Design Before you start building, you need to determine the size and style of your shed. Consider how many bins you need to accommodate and the overall aesthetic you want to achieve. Measure your garbage cans (height, width, and depth) to ensure they will fit comfortably inside. Sketch a rough design, noting the dimensions of the base, walls, roof, and doors. A simple, rectangular shed with hinged doors is a good starting point for beginners. Account for enough space around the cans for easy maneuverability.
    Step 2: Materials List Based on your design, create a materials list. Here's a basic list for a small, single-bin shed. Adjust quantities based on your specific dimensions:
    • Pressure-treated lumber (for the base and framing)
    • Exterior plywood or siding (for the walls)
    • Roofing material (shingles, corrugated metal, or asphalt roll roofing)
    • Lumber for the doors (consider tongue-and-groove boards)
    • Hinges (for the doors)
    • Latch or lock (for the doors)
    • Fasteners (screws, nails)
    • Wood glue
    • Paint or stain (exterior grade)
    • Gravel (for the base, optional)
    Step 3: Building the Base Begin by constructing the base. Cut the pressure-treated lumber to the desired dimensions. Create a rectangular frame and join the pieces together using screws. Ensure the frame is square. Consider adding support beams within the frame for added strength, especially for larger sheds. Level the ground where the shed will be placed. You can create a gravel base for better drainage and stability. Place the constructed frame on the prepared ground or gravel base.
    Step 4: Framing the Walls Cut the lumber for the wall framing. The height of the walls will depend on the height of your garbage cans and the desired roof slope. Build the front, back, and side wall frames separately. Use screws to join the vertical studs to the top and bottom plates. Ensure the frames are square. Attach the wall frames to the base using screws. Make sure the walls are plumb (perfectly vertical) using a level.
    Step 5: Adding the Siding Cut the plywood or siding to fit the wall frames. Attach the siding to the framing using screws or nails. Ensure the siding is flush with the edges of the frame. Stagger the seams between sheets of siding for added strength and a more aesthetically pleasing look.
    Step 6: Building the Doors Cut the lumber for the doors to the desired size. Assemble the door frames using screws and wood glue. Consider using tongue-and-groove boards for a more solid and weatherproof door. Attach hinges to the door frames and the front wall frame of the shed. Ensure the doors swing freely. Install a latch or lock to secure the doors.
    Step 7: Constructing the Roof Cut the lumber for the roof framing. Determine the desired roof slope. A simple sloped roof is easier to build for beginners. Attach the roof framing to the top of the wall frames. Cover the roof framing with plywood or OSB. Install your chosen roofing material according to the manufacturer's instructions. Overhang the roof slightly beyond the walls to protect them from rain.
    Step 8: Finishing Touches Apply paint or stain to the shed to protect the wood and enhance its appearance. Add any desired trim or decorative elements. Ensure all screws and nails are flush or countersunk. Double-check that the doors open and close smoothly and that the latch or lock is secure.
    Conclusion: A Functional & Attractive Solution By following these steps, you can build a functional and attractive garbage shed that will keep your garbage cans hidden, organized, and protected from the elements. This project requires basic carpentry skills and tools, but the result is a valuable addition to your property. Remember to adjust the design and materials to suit your specific needs and preferences.

    Garbage Truck Unloading Waste At A Garbage Dump In North Rhine-westphalia Stock Photo

    Garbage truck unloading waste at a garbage dump in north rhine-westphalia stock photo www.alamy.com

    🎉 How To Prevent Garbage Pollution. How To Prevent Pollution. 2022-10-06

    🎉 how to prevent garbage pollution. how to prevent pollution. 2022-10-06 childhealthpolicy.vumc.org

    Burning Garbage, But Reducing Greenhouse Gases

    Burning garbage, but reducing greenhouse gases www.japan.go.jp
    Read More..

    116+ Tuff Built Sheds Morayfield

    Rabu, 22 Oktober 2025

    0 komentar
    Tuff geology.com

    ```html
    Introduction: Building Your Own Tuff Shed Alternative Thinking of adding a shed to your property without breaking the bank? Building your own shed, inspired by Tuff Sheds, is a rewarding DIY project. This guide provides a step-by-step approach to constructing a durable and functional shed.
    Planning and Preparation Before you start hammering, careful planning is essential.
  • Determine the shed's size and location. Consider local building codes and zoning regulations.
  • Create a detailed blueprint or use a pre-designed shed plan. This includes dimensions, material list, and construction steps.
  • Gather the necessary tools: Saw (circular and/or hand saw), drill, level, measuring tape, hammer, square, safety glasses, and work gloves.
  • Purchase your materials: Lumber (pressure-treated for the base), plywood or OSB sheathing, roofing materials (shingles, metal, etc.), siding materials, nails, screws, hinges, and a door.
  • Step 1: Building the Foundation A solid foundation is crucial for a stable shed.
  • Clear the area where the shed will be built, removing any vegetation or debris.
  • Construct a level base using pressure-treated lumber. Options include a gravel pad, concrete slab, or a framed base with concrete piers. A framed base is generally the most cost-effective for a DIY project.
  • For a framed base, create a rectangular frame according to your plan. Ensure it's square using the 3-4-5 rule (measure 3 feet along one side, 4 feet along the adjacent side, and the diagonal should be 5 feet).
  • Secure the frame with screws and add internal support joists spaced 16 inches apart.
  • Level the frame using shims as needed.
  • Step 2: Framing the Walls Wall framing defines the shed's structure.
  • Cut lumber to the correct lengths for the wall studs, top plates, and bottom plates based on your plan.
  • Assemble the wall frames on the ground, nailing or screwing the studs to the top and bottom plates. Maintain a standard spacing of 16 inches on center between studs.
  • Frame in door and window openings as specified in your plan.
  • Raise each wall frame and secure it to the foundation frame, ensuring it's plumb (perfectly vertical) using a level.
  • Brace the walls temporarily with diagonal supports to prevent them from falling over until they are sheathed.
  • Step 3: Installing the Roof The roof protects the shed from the elements.
  • Construct the roof rafters according to your plan. Common roof styles include gable (A-frame) and shed (single slope).
  • Attach the rafters to the top plates of the walls, ensuring they are evenly spaced and securely fastened.
  • Sheathe the roof with plywood or OSB, nailing or screwing it to the rafters.
  • Apply roofing underlayment (felt paper) to protect the sheathing from moisture.
  • Install your chosen roofing material (shingles, metal roofing, etc.) following the manufacturer's instructions. Overlap each piece properly for weather protection.
  • Step 4: Adding Siding and Doors Siding provides weather protection and aesthetic appeal, while the door provides access.
  • Attach the siding material (wood, vinyl, metal) to the wall frames, following the manufacturer's instructions. Overlap or seal the seams to prevent water intrusion.
  • Frame the door opening if not already done.
  • Install the door, ensuring it swings smoothly and closes securely. Add hinges, a handle, and a latch.
  • Step 5: Finishing Touches Details enhance the shed's functionality and appearance.
  • Install windows if desired, following the manufacturer's instructions.
  • Caulk any gaps around the windows, door, and siding to prevent drafts and water leaks.
  • Add trim to the corners and around the door and windows for a finished look.
  • Consider adding shelves, workbenches, or other storage solutions to customize the shed's interior.
  • Paint or stain the shed to protect the wood and enhance its appearance.
  • Conclusion: Your DIY Shed Success Congratulations on building your own shed! By following these steps, you've created a functional and cost-effective storage space that will serve you for years to come. Remember to regularly inspect and maintain your shed to ensure its longevity.
    ```

    Volcanic Tuff (near Cripple Creek, Colorado, Usa) 1

    Volcanic tuff (near cripple creek, colorado, usa) 1 www.flickriver.com

    Mineralatlas Lexikon

    Mineralatlas lexikon www.mineralienatlas.de

    Tuff

    Tuff geology.com
    Read More..

    200+ Shed Office Plans

    Selasa, 21 Oktober 2025

    0 komentar
    10x12 lean to office shed plan shedplans.org

    ```html
    Introduction: Your DIY Shed Office Awaits! Creating a dedicated workspace can dramatically improve focus and productivity. A shed office offers a cost-effective and customizable solution, separating work from home life. This guide provides a step-by-step approach to building your own inspiring shed office.
    Step 1: Planning and Design Before lifting a hammer, meticulous planning is crucial. Consider the following:
    • Shed Size: Determine the dimensions based on your needs (desk space, storage, seating).
    • Location: Choose a relatively level area in your yard, considering sunlight exposure and accessibility.
    • Permits: Research local building codes and obtain necessary permits.
    • Foundation: Decide on a foundation type (concrete slab, gravel pad, or skids).
    • Utilities: Plan for electricity, internet, and potentially plumbing if desired.
    • Design Layout: Sketch a floor plan including desk placement, window locations, and door positioning.
    Step 2: Foundation Construction The foundation is the bedrock of your shed office.
    • Concrete Slab: Prepare the site, pour concrete, and level it. Allow ample curing time.
    • Gravel Pad: Excavate the area, add landscape fabric, compact gravel, and level it.
    • Skids: Construct a wooden frame from pressure-treated lumber, ensuring proper support and leveling.
    Step 3: Framing the Shed This step involves building the skeleton of your shed.
    • Wall Framing: Construct wall frames using lumber, ensuring proper spacing for studs.
    • Raise the Walls: Carefully raise the wall frames, securing them to the foundation and each other.
    • Roof Framing: Build rafters or trusses according to your design, ensuring proper pitch and support.
    Step 4: Sheathing and Roofing This step will protect your shed from the elements.
    • Wall Sheathing: Cover the exterior walls with plywood or OSB sheathing, securing it with nails or screws.
    • Roof Sheathing: Apply sheathing to the roof frame, ensuring proper overhang.
    • Roofing Material: Install roofing felt, followed by your chosen roofing material (shingles, metal, etc.).
    Step 5: Windows and Doors Install windows and doors to allow light and access.
    • Window Installation: Frame the window openings and install windows according to manufacturer instructions.
    • Door Installation: Frame the door opening and install the door, ensuring proper swing and closure.
    Step 6: Siding and Exterior Finishing Apply siding to the exterior to protect and enhance the appearance.
    • Siding Installation: Choose your siding material (wood, vinyl, metal) and install it according to manufacturer instructions.
    • Painting/Staining: Paint or stain the siding for weather protection and aesthetics.
    • Trim: Add trim around windows, doors, and corners for a finished look.
    Step 7: Insulation and Interior Finishing Insulate and finish the interior for comfort and functionality.
    • Insulation: Install insulation in the walls, ceiling, and floor to regulate temperature.
    • Interior Walls: Install drywall or paneling on the interior walls, taping and sanding seams for a smooth finish.
    • Flooring: Install flooring material (laminate, vinyl, carpet) according to manufacturer instructions.
    • Painting/Staining: Paint or stain the interior walls and trim to your desired color.
    Step 8: Electrical and HVAC (if applicable) This step involves installing electrical wiring and HVAC systems.
    • Electrical Wiring: Hire a qualified electrician to install electrical wiring, outlets, and lighting fixtures.
    • HVAC: Install a heating and cooling system, if desired (window AC unit, space heater, mini-split system).
    Step 9: Internet Connectivity Ensure your shed office has a reliable internet connection.
    • Wired Connection: Run an Ethernet cable from your house to the shed for a stable connection.
    • Wireless Connection: Use a Wi-Fi extender or mesh network to improve Wi-Fi signal strength.
    Step 10: Furnishing and Decorating Make your shed office functional and inspiring.
    • Desk and Chair: Choose a comfortable desk and ergonomic chair.
    • Storage: Add shelves, cabinets, or drawers for storage.
    • Lighting: Install task lighting and ambient lighting to create a comfortable workspace.
    • Decor: Personalize the space with plants, artwork, and other decorative items.
    Conclusion: Enjoy Your New Workspace! Congratulations on building your DIY shed office! With careful planning and execution, you've created a dedicated and inspiring workspace that will enhance your productivity and well-being. Remember to maintain your shed office regularly to ensure its longevity and functionality.
    ```

    Diy Backyard Office Studio Shed Plans

    Diy backyard office studio shed plans shedplans.org

    Diy Backyard Office Studio Shed Plans

    Diy backyard office studio shed plans shedplans.org

    10x12 Lean To Office Shed Plan

    10x12 lean to office shed plan shedplans.org
    Read More..

    75+ Shed Layout Plan

    Senin, 20 Oktober 2025

    0 komentar
    Cedar shed cubby decorativewooden.blogspot.com

    Introduction: Building Your Own Versatile Shed Building a shed can be a rewarding DIY project that provides extra storage space, a workshop, or even a hobby room. This guide will walk you through the essential steps to build a simple, yet sturdy shed, suitable for various purposes. Before starting, ensure you have the necessary tools, materials, and comply with local building codes and regulations. A good plan is essential, and we'll be focusing on creating a straightforward gable shed.
    Step 1: Planning and Preparation Before hammering a single nail, careful planning is critical. This includes determining the shed's size, location, obtaining necessary permits, and gathering your materials.
  • Determining the Size and Location: Consider the amount of space you need and the available area in your yard. Ensure the location is relatively level and has good drainage. Mark the area with stakes and string.
  • Obtaining Permits: Check with your local building department about permit requirements. Sheds often require permits depending on their size and location on your property.
  • Creating a Materials List: Based on your chosen shed size, create a detailed materials list. This includes lumber (pressure-treated for the base), plywood, roofing materials, siding, nails, screws, and other hardware. Don't forget tools!
  • Step 2: Building the Foundation A solid foundation is crucial for a long-lasting shed. We'll be using a simple gravel and concrete block foundation for this project.
  • Clearing the Area: Remove any vegetation, rocks, or debris within the marked area.
  • Gravel Bed: Spread a layer of gravel (approximately 4-6 inches thick) within the marked area. Compact the gravel to create a level base.
  • Concrete Blocks: Place concrete blocks on top of the gravel bed, spaced evenly. The blocks will support the floor frame. Use a level to ensure all blocks are level.
  • Step 3: Constructing the Floor Frame The floor frame provides a stable base for the shed walls and roof. Use pressure-treated lumber for the frame to resist moisture and rot.
  • Cutting the Lumber: Cut the lumber according to your planned dimensions.
  • Assembling the Frame: Assemble the perimeter frame using nails and screws. Ensure the corners are square.
  • Adding Joists: Install floor joists within the frame, spaced evenly (typically 16 inches on center). These joists provide support for the floor sheathing.
  • Attaching the Floor Sheathing: Attach plywood or OSB sheathing to the floor frame using nails or screws.
  • Step 4: Framing the Walls The walls provide the structural support for the shed. Frame them on the ground and then raise them into place.
  • Cutting the Lumber: Cut the lumber for the wall studs, top plate, and bottom plate.
  • Assembling the Wall Frames: Assemble each wall frame by attaching the studs to the top and bottom plates. Studs are typically spaced 16 inches on center. Include openings for doors and windows, framing them with headers and cripple studs.
  • Raising and Securing the Walls: Raise each wall frame into place, ensuring it's plumb and square. Secure the walls to the floor frame using nails and screws. Connect the walls to each other at the corners.
  • Step 5: Building the Roof The roof protects the shed from the elements. A simple gable roof is a good choice for beginners.
  • Cutting Rafters: Cut the rafters according to your planned roof pitch and dimensions. You'll need to calculate the angles for the rafter cuts.
  • Assembling the Rafters: Assemble the rafter pairs and attach them to the top plates of the walls. Ensure the rafters are evenly spaced and securely fastened.
  • Adding the Roof Sheathing: Attach plywood or OSB sheathing to the rafters. Overlap the seams and use nails or screws to secure the sheathing.
  • Step 6: Adding Siding and Roofing This step involves protecting the shed from the weather.
  • Installing Siding: Install your chosen siding material (e.g., wood, vinyl, metal) to the walls. Start at the bottom and work your way up, overlapping each course of siding.
  • Installing Roofing: Install underlayment (felt paper) over the roof sheathing. Then, install your chosen roofing material (e.g., asphalt shingles, metal roofing). Follow the manufacturer's instructions for proper installation.
  • Step 7: Installing Doors and Windows Doors and windows provide access and light to the shed.
  • Installing Doors: Install the door frame and then hang the door. Ensure the door swings freely and closes securely. Install hardware such as hinges, a door handle, and a latch.
  • Installing Windows: Install the window frame and then install the window. Caulk around the window to prevent leaks.
  • Step 8: Finishing Touches These finishing touches add functionality and aesthetic appeal to your shed.
  • Adding Trim: Install trim around the doors, windows, and corners to cover the gaps and add a finished look.
  • Painting or Staining: Paint or stain the shed to protect the siding and enhance its appearance.
  • Adding Shelving and Storage: Install shelving, hooks, and other storage solutions to maximize the shed's functionality.
  • Conclusion: Enjoying Your New Shed Congratulations! You've successfully built your own shed. With proper care and maintenance, it will provide valuable storage and workspace for years to come. Remember to inspect the shed regularly and make any necessary repairs to ensure its longevity.

    Lifetime Side Entry 10 Ft. W X 8 Ft. D Plastic Storage Shed & Reviews

    Lifetime side entry 10 ft. w x 8 ft. d plastic storage shed & reviews www.wayfair.com

    Factor Brown Large Storage Shed

    Factor brown large storage shed www.keter.com

    Cedar Shed Cubby

    Cedar shed cubby decorativewooden.blogspot.com
    Read More..

    57+ Storage Shed Echuca

    Minggu, 19 Oktober 2025

    0 komentar
    Buy storage bins with lids-78 quart plastic storage bins,4 packs stackable storage bins with www.desertcart.in

    Opening: Building Your Own Storage Shed Are you tired of clutter? Dreaming of a dedicated space for your tools, garden equipment, or seasonal decorations? Building your own storage shed can be a rewarding and cost-effective solution. This guide provides a step-by-step process to help you construct a sturdy and functional storage shed, tailored to your specific needs and property. Let's get started!
    Step 1: Planning and Preparation Before you even pick up a hammer, careful planning is crucial.
  • Determine the Size and Location: Consider what you'll be storing and the available space in your yard. Check local zoning regulations for shed size limits and setback requirements. Also, think about accessibility.
  • Create a Detailed Plan: Sketch out your shed design, including dimensions, door and window placements, and roofing style. Many free shed plans are available online.
  • Gather Materials and Tools: Make a comprehensive list of all the materials you'll need, including lumber, roofing materials, siding, fasteners, and concrete for the foundation (if applicable). Rent or borrow any tools you don't already have, such as a circular saw, drill, level, and measuring tape.
  • Obtain Necessary Permits: Inquire with your local building department about any required permits. Failing to obtain permits can result in fines or forced removal of the shed.
  • Step 2: Building the Foundation The foundation is the most critical part of your shed. A solid foundation ensures the longevity and stability of the entire structure. Options include concrete slab, gravel pad, or a wooden frame foundation. We'll cover a basic wooden frame foundation.
  • Prepare the Site: Clear the area of vegetation, rocks, and debris. Level the ground using a shovel and rake.
  • Build the Frame: Construct a rectangular frame from pressure-treated lumber (e.g., 4x4 or 4x6). Ensure the frame is square using a measuring tape and corner braces.
  • Level and Secure the Frame: Use a level to ensure the frame is perfectly level. Shim as needed. Secure the frame to the ground using stakes or concrete blocks.
  • Add Floor Joists: Install floor joists within the frame, typically spaced 16 inches apart. Use hangers to attach the joists to the frame.
  • Install Subflooring: Cover the joists with plywood or OSB subflooring. Screw the subflooring securely to the joists.
  • Step 3: Framing the Walls Now it's time to build the walls of your shed.
  • Cut the Wall Studs: Cut the wall studs to the appropriate height. Remember to subtract the thickness of the top and bottom plates.
  • Assemble the Wall Frames: Lay out the top and bottom plates on the ground. Position the wall studs between the plates, typically spaced 16 inches apart. Nail or screw the studs to the plates.
  • Frame Door and Window Openings: Frame the door and window openings with headers and trimmers.
  • Raise and Secure the Walls: Carefully raise each wall frame and secure it to the foundation. Use temporary braces to keep the walls plumb.
  • Connect the Walls: Connect the walls to each other at the corners, using nails or screws.
  • Step 4: Installing the Roof The roof protects your shed from the elements.
  • Install Rafters or Trusses: Install rafters or trusses according to your shed plan. Ensure they are properly spaced and securely attached to the wall frames.
  • Sheathe the Roof: Cover the rafters or trusses with plywood or OSB sheathing. Nail or screw the sheathing to the rafters.
  • Install Roofing Underlayment: Apply roofing underlayment (felt paper) to the sheathing to provide a waterproof barrier.
  • Install Roofing Material: Install your chosen roofing material, such as asphalt shingles, metal roofing, or wood shakes. Follow the manufacturer's instructions carefully.
  • Step 5: Adding Siding and Finishing Touches Now you'll add siding to protect the walls and give your shed a finished look.
  • Install Siding: Install siding to the walls, such as wood siding, vinyl siding, or metal siding. Overlap the siding panels according to the manufacturer's instructions.
  • Install Doors and Windows: Install the doors and windows into the framed openings. Ensure they are plumb and level.
  • Add Trim: Add trim around the doors, windows, and corners to conceal the edges of the siding.
  • Paint or Stain: Paint or stain the shed to protect the wood and give it a finished appearance.
  • Step 6: Interior Finishing (Optional) Depending on your needs, you may want to finish the interior of your shed.
  • Insulation: Insulate the walls and ceiling to regulate the temperature inside the shed.
  • Electrical Wiring: Install electrical wiring for lighting and power outlets (if desired). Consult with a qualified electrician.
  • Shelving and Storage: Add shelving, workbenches, or other storage solutions to organize your tools and equipment.
  • Conclusion: Enjoy Your New Storage Shed Congratulations! You've successfully built your own storage shed. With proper planning, careful execution, and attention to detail, you can create a functional and durable space that will serve your storage needs for years to come. Remember to regularly inspect your shed for any signs of damage and perform necessary maintenance to keep it in good condition. Now, step back and admire your handiwork!

    Storage In Toronto, On Storage Facility

    Storage in toronto, on storage facility mystorage.ca

    Buy Storage Bins With Lids-78 Quart Plastic Storage Bins,4 Packs Stackable Storage Bins With

    Buy storage bins with lids-78 quart plastic storage bins,4 packs stackable storage bins with www.desertcart.in

    Storage Ideas For Your Entire Home

    Storage ideas for your entire home stownest.com
    Read More..

    Copyright © 2014 icreatables cheap | Powered By Blogger